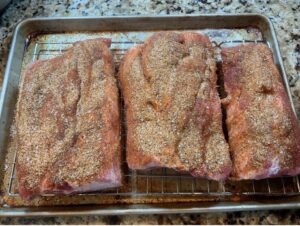
You're now ready to put on some dry BBQ rub. I like to use either my Commando Dave's Original Rub or my Commando Dave's Caveman Rub; both work great on ribs. Rub to ribs basic ratio: 1 tablespoon of rub per 1lb of ribs, coating it evenly along the meaty side of the ribs. While your ribs are getting acquainted with the dry rub, it's time to prepare your grill. Because ribs are a tough, fibrous cut of meat, you want to use indirect heat to smoke your ribs "low and slow" as the saying goes. You may even want to put an aluminum foil tray filled with water under your ribs to help with humidity and preventing flare-ups during cooking. Your smoker should be set at 225 degrees. While your smoker is coming up to temperature, you can get your smoking wood ready. Folks, there's an endless debate on the types of wood smoke you should use for BBQing ribs. I'm staying out of that fray (for now) and stick with the default answer that it's a matter of personal preference. I like woods that accent the flavor of the pork without risking too much bitterness. So my personal preference is hickory, fruit woods (namely peach and apple), and - even you want to spend a little more money - the wood chips from old bourbon barrels (which impart a great vanilla scent).
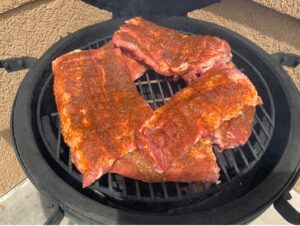
My preferred wood for smoking ribs: hickory, peach, apple, or bourbon barrel oak. Once you have your smoker, wood chips, and ribs ready, it's time to get the ribs cooking (finally, right?!?). This part for me using a Big Green Egg is like playing beat the clock or to smoke inhalation, so you've got to ready to move with alacrity. It's a series of rapid actions: wood on the hot coals, putting the offset plate (for indirect heat) over the coals, then putting the grill on the offset plate, and getting the ribs onto the grill...all while wearing heavy duty welding gloves so I don't incur more burn scar tissue than I already have... Organizing your racks of ribs on the grill can be a bit like stacking cards. If you have a rib rack then you can organize your ribs nice and easy on the grill. However, you can do just as well by propping the ribs against each other so that the meat side of the ribs gets maximum exposure to the smoke. If you're maxing your grills capacity like I often do when doing ribs for a big party, then you're going to have to stack, sort, and rearrange the ribs throughout the smoking process. Not really a big deal, and - let's be honest - it gives you a chance to check on the ribs every 30 minutes or so and shift things around (because we're doers, people!). Another advantage to periodically rearranging your ribs around the smoker is that it helps with even smoking since every grill has hot spots (i.e., heat does not diffuse evenly around the grill regardless of what marketing experts tell you). Now that you have your ribs cooking, you can relax just a little bit and enjoy the smell of glory! You really want to keep the lid down on your smoker during the first 30 minutes when the smoke is roiling at its heaviest and imparting that heavenly flavor and smoke ring to your ribs. After 30 minutes, you can do your first look and rearrangement, if needed, of your ribs. Try to minimize the amount of time you have your lid off the smoker. You want to preserve as much heat and smoke as possible. After an hour or so of smoking then ribs, when they're starting to develop the bark (crust) on the outside, you can begin the optional spraying of your ribs with a liquid spray bottle set on fine mist.
Purists may eschew spraying as not adhering to the pure form of dry rub ribs. Blah, blah, blah. This is about the tastes and preferences of those you're cooking for, right? So sometimes I'll spray my ribs and other times I won't, based on who I'm feeding and (brain damage moment) whether I remembered to buy the right liquid beforehand. What liquids to use? I prefer apple juice or cider for non-alcoholic options since apple and pork are such great flavor partners. If you want to use beer instead (and most if not all of the alcohol evaporates during cooking), I like using beers with a higher malt flavor since the sweetness compliments the flavor of pork. Best bets for beer are dubbel (Belgian) or bock (German) style beers. Now please notice I do not use a BBQ sauce for basting my ribs. Why? Because a traditional BBQ sauce has a high sugar content and that sugar tends to burn under the BBQ heat. So I strongly recommend you refrain from basting your ribs with BBQ sauce while on the grill. If, and frankly that's a big "IF," you're going to use a BBQ sauce, then use it as a side condiment when serving your ribs. Done properly, dry rub BBQ ribs are moist and tender and succulent enough that you really don't need a BBQ sauce. Doing ribs with the method I describe here, I think you'll find that BBQ sauce becomes an optional condiment. Your call, Grill Commandos; I'm not judging.
Optional liquids for spraying meat during cooking: apple juice, apple cider, dubbel style beer, bock style beer.
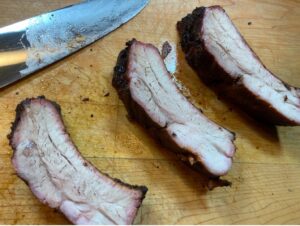
Big question: how long does it take to smoke ribs? Well, no easy answer here since it depends on a number of factors (heat, ambient temperature, altitude - yes, physics gets a vote). I've found over the years that 10lbs (three full racks) of ribs is usually fully cooked in 4 hours at 200-225 degrees (and at 6,900ft altitude where I live). The best way to test ribs for doneness is threefold: 1) looking at the rib ends to see if the meat has shrunk away from the ends, 2) wiggling the exposed rib ends to see if the bones are pulling away from the meat, and 3) the most accurate and food safety-conscious method of checking the rib meat temperature to ensure they're at 195-200 degrees. On the latter method, I know that 195-200 degrees is significantly higher than the USDA guidelines of serving pork at 145 degrees. Why the difference? Keep in mind that you're cooking a tough, fibrous cut of pork. Rib meat comes from the intercostal muscles that animals use constantly when they breathe, so the increased use over the animal's life means increased time and temperature when cooking. So smoking the meat to the higher temperature of 195-200 degrees gives it more time to break down the tough collagenous and fibrous tissues and render the smokey goodness you're aiming for. Once your ribs are fully cooked, then it's time to take them off the grill and let them rest in a foil covered dish or bowl. Resting your BBQ, regardless of the type of meat or poultry, is an essential part of the process. Resting allows your meat to relax from the heat (which is why you see so much liquid released after cooking meat), resulting in increased tenderness. Give it 10-15 minutes to rest, and don't worry about your food becoming cold: the residual heat from the grill and the heat imparted from the bones will keep your ribs nice and serving temperature hot. The final step, and I do this right at service (almost like a carving station at a buffet line), is cutting the ribs into individual pieces. That makes it easier for your eaters and it also showcases that beautiful pink/red smoke ring you developed during the cooking process (no artificial, chemically-induced smoke rings here).
Get ready for some eye-rolling and heads thrown back in joy from your eaters. I've even had people start to weep with happiness with my ribs. And you'll get that reaction as well. Enjoy it because you've earned it! Way to go, Grill Commando!
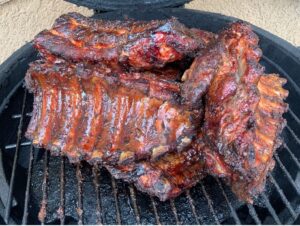
As for recommended sides, I like the tried and true side dishes of coleslaw or cold potato salad, as well as a sweet summer fruit (watermelon, honeydew, cantaloupe, berries). The coolness and sweetness of the sides complements the warmth (both temperature and spice) of the ribs. Lastly, a note on sauce. As you can see from the picture above (Figure 7), ribs smoked this way don’t require a wet sauce. They’re moist and tender and pack a punch of flavor. That said, you’re of course welcome to add BBQ sauce at the end or as a side condiment. I recommend my Commando Dave’s Liberty BBQ Sauce because “we hold these truths to be self-evident, that not all BBQ sauces are created equal!”
Bon Appetite, Grill Commandos, and remember: Fortune Favors the Hungry!